Import Wire Using New Template
Wire Manager extends you the ability to establish new import wire transfer templates when you select the Import Wire Using Template functionality. If the Template field does not match the imported wire file, the system displays the warning message, "Invalid record type in file", and stops the import process.
The following sections display on this page:
Apply Additional Values to File
User List
The User List displays the names of users that have access to establish an import wire transfer using a new template.

Name
Name of the user that the system associates with the financial institution
Client Code
Client code that the system associates with the user
User Type
User type of the wire user
Back to Top
Step 1 - File Selection
After the system initiates the file import process, the user interface program populates with the first of several steps that it requires to successfully import wire transfers that use new templates. The system displays the fields that it associates with the wire transfer templates that you establish.

File Location
Directory path of the wire transfer file that you import into Wire Manager. To select a wire transfer file for import, click Browse, navigate to the appropriate folder directory, and then select the wire transfer file for import.
Back to Top
Step 2 - Template Details
After you select a Wire Manager file for import, you can define the import wire transfer type, and assign identification attributes to the wire transfer file.
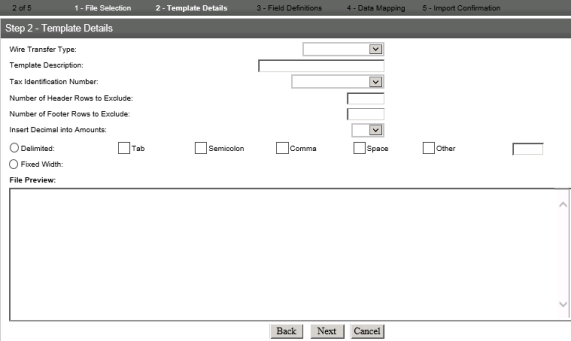
Wire Transfer Type
Indicates the wire transfer template type. The following table lists the values.
|
Domestic |
indicates that the system uses a domestic wire transfer template |
|
International |
indicates that the system uses an international wire transfer template |
|
Domestic Correspondent |
indicates that the system uses a domestic correspondent wire transfer template |
|
International Correspondent |
indicates that the system uses an international correspondent wire transfer template |
Template Description
Name of the wire transfer template
Tax Identification Number
Type or select the tax ID number of the account owner at the Originating Depository Financial Institution (ODFI).
Number of Header Rows to Exclude
Type the number of header rows at the beginning of the file that the system excludes during the file import.
Number of Footer Rows to Exclude
Type the number of footer rows at the end of the file that the system excludes during the file import.
Insert Decimal into Amount
Indicates whether the system automatically inserts the decimal into the wire transfer amount. The following table lists the values.
|
Yes |
indicates that the system inserts the decimal in the right most digits of the wire transfer amount |
|
No |
indicates that the system does not insert a decimal point in the wire transfer account |
Delimited
Indicates the type of delimited format that the system uses in the import file when you select Delimited. The following table lists the values.
|
Tab |
indicates that the file delimiter is a tab |
|
Semicolon |
indicates that the file delimiter is a semicolon |
|
Comma |
indicates that the file delimiter is a comma |
|
Space |
indicates that the file delimiter is a space |
|
Other |
indicates that the file delimiter is other than a tab, a semicolon, a comma, and a space |
Fixed Width
Each field in the template has a fixed, defined width, padding shorter values with characters. This option produces a file format preview with column headers in Step 3 - Field Definitions. The system overrides any selections in the Delimited field, as the files are either delimited or fixed width.
File Preview
Preview of the import file format.
If the system requires a data type value that you have not defined, you must define the value in the Apply Additional Values to File section in Step 3 - Field Definitions.
Back to Top
Step 3 - Field Definitions
The Step 3 - Field Definitions sections extends you the ability to assign each piece of data in the import file a data type, assign additional data type values, select the funding account, and define the effective date option.
Field definitions vary based on the delimited format that you select (we use Tab as an example only).
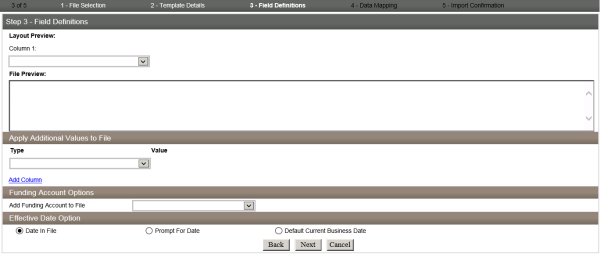
Layout Preview
Preview of the Wire Manager file format. When the import file contains data in the columns, Layout Preview displays a drop-down list for each column header. Select the data type for each column from the Column N drop-down list.
N = the column number
The data type varies by the Wire Manager transfer type that you specify for the template. If only a single column displays in the Layout Preview, you must define the data types in the Apply Additional Values to File section.
File Preview
Preview of the import file format
If the system requires a data type value that you have not defined, you must define the value in the Apply Additional Values to File section.
Back to Top
Apply Additional Values to File

Type
Indicates the data type value. The following lists the values.
|
(None) |
indicates that you have not defined the data type |
|
Amount |
indicates that the data type is the import transfer account |
|
Beneficiary Address |
indicates that the data type is address of the beneficiary |
|
Beneficiary Identification Number |
indicates that the data type is the identification number that the system assigns to the beneficiary |
|
Beneficiary Identification Type |
indicates that the data type is the beneficiary's identification type |
|
Beneficiary Institution Address |
indicates that the data type is the address of the beneficiary's institution |
|
Beneficiary Institution Identification Number |
indicates that the data type is the identification number that the system assigns to the beneficiary institution |
|
Beneficiary Institution Identification Type |
indicates that the data type is the beneficiary institution identification type |
|
Beneficiary Institution Name |
indicates that the data type is the name of the beneficiary's institution |
|
Beneficiary Name |
indicates that the data type is the name of the beneficiary |
| Beneficiary Reference | indicates that the data type is the alphanumeric identification code that the system assigns to the beneficiary |
| Message To Beneficiary | indicates that the data type is the message sent to the beneficiary from the Originating Depository Financial Institution (ODFI) |
| Receiving Institution Name | indicates that the data type is the name of the receiving institution |
| Receiving Institution Routing Transit | indicates that the data type is the Receiving Depository Financial Institution (RDFI) routing transit number |
| Transfer Date | indicates that the data type is the date of the transfer |
Value
Type the data type value for each field.
Add Column (hyperlink)
Click the Add Column hyperlink to add additional data type values to the import file.
Back to Top
Funding Account Options

Add Funding Account to File
Indicates the funding account of the import transfer file.
Back to Top
Effective Date Option

Date In File
Indicates that the system processes the import file using the effective date that you define in the import file.
Prompt For Date
Indicates that the system prompts you to select the effective date of the import file.
Default Current Business Date
Indicates that the system processes the import file using the current business date.
Back to Top
Step 4 - Data Mapping
After the system assigns each piece of data in the import file a data type, Step 4 - Data Mapping provides an overview and confirmation that the data is mapped. The system displays an error message when it assigns the data type incorrectly. You can click Back to make any necessary modifications.
Data that the system maps may vary based on the wire type that you import (we use Tab as an example only).
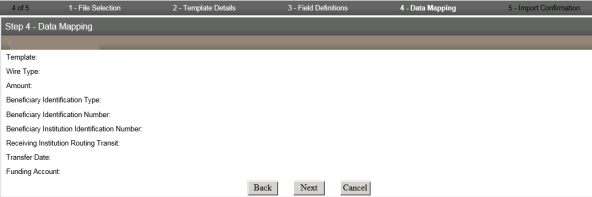
Template
Name of the wire import file template
Wire Type
Wire transfer template type
Amount
Amount of the wire transfer
Beneficiary Identification Type
Identification type of the beneficiary
Beneficiary Identification Number
Identification number that the system assigns to the beneficiary
Beneficiary Institution Identification Number
Institution number that the system assigns to the beneficiary
Receiving Institution Routing Transit
Receiving Depository Financial Institution (RDFI) routing transit number
Transfer Date
Date that the system initiates the wire transfer
Funding Account
Name of the wire transfer funding account
Back to Top
Step 5 - Import Confirmation
The Step 5 - Import Confirmation section extends you the ability to review the import file detail information when you click the Expand All hyperlink before you save, process, or discard the import file. The system displays the wire transfer details on the import confirmation page that corresponds with the type of wire transfer that you import. Click Finish to process the import file.

File Name
Name of the wire transfer file
Amount
Amount of the wire transfer
Beneficiary Name
Name of the beneficiary
Select All (hyperlink)
Indicates the actions that the system displays. Click the Select All hyperlink to select the action that you want the system to perform. The following tables lists the values.
|
Save |
indicates that the system saves the transfer in the import file |
|
Review |
indicates that you can review the transfer in the import file |
|
Process |
indicates that the system processes the transfer in the import file |
|
Discard |
indicates that the system discards the transfer in the import file |
Back to Top
Confirmation Page
The system displays the confirmation box when you successfully process or save wire transfers.
The ![]() Errors box indicates that the system does not process the wire transfer with a reference number and an error message.
Errors box indicates that the system does not process the wire transfer with a reference number and an error message.
The ![]() Warnings box indicates that the system generates the wire transfer with a reference number and a warning message.
Warnings box indicates that the system generates the wire transfer with a reference number and a warning message.
The ![]() Success box indicates that the system successfully processes the wire transfer.
Success box indicates that the system successfully processes the wire transfer.
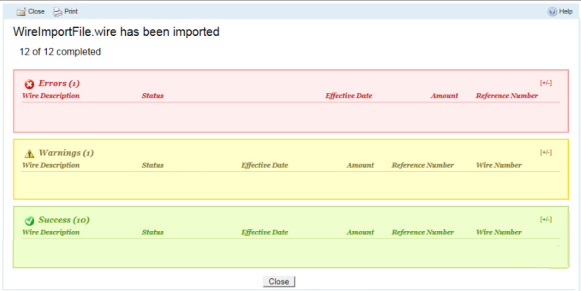
Wire Description
Name of the wire transfer
Status
Status of the wire transfer
Effective Date
Date that the system processes the wire transfer
Amount
Amount of the wire transfer
Reference Number
Reference number that the system assigns to the wire transfer
Wire Number
Identification number that WireXchange assigns to the wire transfer
See Also: