Import ACH Transfers
The import functionality is utilized to import NACHA and Non NACHA formatted transfers into ACH Manager. Further, the import functionality includes the ability to utilize established ACH Manager templates to validate information present in an import file.
The following sections display on this page:
NACHA Formatted Transfers - ACH Pass-Thru
NACHA Formatted Transfers
NACHA formatted transfers are represented by transfers established from files, including templates that conform to the standard format as defined by federal reserve in the NACHA ACH File Exchange specifications. When the import functionality is initiated, ACH Manager launches a wizard that proceeds through several steps that contain fields and options that must be specified prior to submitting the file for processing. NACHA formatted transfer files can be imported with or without the use of an established NACHA template.
Step 1 - File Selection
Once the file import process is initiated, the user interface populates with the first of several steps that are required to successfully import a NACHA formatted ACH transfer. The fields that display are governed by the user's association with any established ACH transfer templates.

|
|
ACH Users that are not associated with any ACH file import templates can import NACHA formatted ACH transfers. 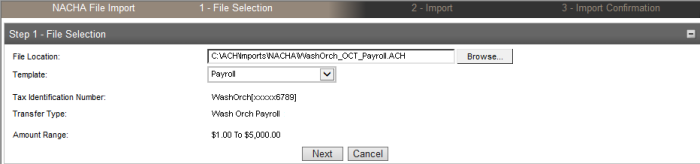
|
ACH Users that are associated with an ACH file import template are presented with a list of templates to chose from.
Amount Range
These fields represent the lower and upper dollar amount ![]() limits for ACH transfers imported into ACH Manager and submitted for processing using the template.
limits for ACH transfers imported into ACH Manager and submitted for processing using the template.
The amount range does not override or remove the application of any limits established for a limit group that is applied to the ACH user executing the import. For example, the amount range of the template is established as $1.00 to $1,000.00. The ACH user executing the import is tied to a limit group that has a per-transfer debit and credit limit of $500.00. The NACHA formatted transfer that is being imported is made up of a $700.00 Prearranged Payment (PPD).
Result: The NACHA formatted transfer file would be successfully imported into ACH Manager and then flagged for additional review because the transfer exceeded an established limit.
File Location
The directory path where ACH transfer files, correctly formatted and containing stored values, are located for import. To select a file for import, click Browse, navigate to the appropriate folder directory and select the ![]() transfer file for import.
transfer file for import.
The selected file must be in the correct format for the import type or ACH Manager displays the message, "Invalid record type in file" and stops the import process. To continue, click Browse and select a file formatted to match the import type.
Tax Identification Number
The tax identification number of the account owner at the Originating Depository Financial Institution (ODFI). This field populates as a drop-down list in the event there are multiple companies associated with a given account holder. For example, George Washington is tied to accounts servicing Washington Orchards and Washington Agricultural Group, Inc. Subsequently, the tax identification numbers associated with Washington Orchards and Washington Agricultural Group, Inc. populate the Tax Identification Number.
Template
The ![]() template against which the imported transfer file is validated. The list contains only those templates matching the current import type to which the current user has access. If the ACH user does not have access to any templates, the Template field does not display.
template against which the imported transfer file is validated. The list contains only those templates matching the current import type to which the current user has access. If the ACH user does not have access to any templates, the Template field does not display.
Selecting an established template in the Template drop-down list automatically populates the Tax Identification Number and Transfer Type fields, and displays the Amount Range field when the range is defined in the template.
If the selected template contains required fields (for example, Required Funding Transactions) whose values are missing from the selected transfer file, ACH Manager displays the message, "File is not as per the selected format".
The Template field displays only if the current user has access to at least one stored NACHA template.
Transfer Type
The Transfer Type field appears as a drop-down list from which you can select the ![]() type of transfer that is imported.
type of transfer that is imported.
Payroll (PPD)
indicates a payroll transfer that originates from an account at a employer's financial institution and is deposited to an account at an employee’s financial institution
Prearranged Deposit (PPD)
indicates a prearranged deposit transfer credit application that transfers funds into a consumer’s account at the Receiving Depository Financial Institution (RDFI)
Prearranged Payment (PPD)
indicates a prearranged payment transfer debit application. For example, monthly payments of household utility bills can be collected using this transfer type.
HSA Contribution (PPD)
indicates a Health Savings Account (HSA) contribution transfer
Corporate Credit (CCD)
indicates a business to business transaction in which funds are transferred from one organization to another. In this case, the originator receives an authorization from the receiver, giving the originator permission to send a credit entry to their business account.
Corporate Debit (CCD)
indicates a business to business transaction in which funds are transferred from one organization to another. In this case, the originator receives an authorization from the receiver, giving the originator permission to send a debit entry to their business account.
Consumer Deposit (CIE)
indicates a variant of the Customer Initiated Entry (CIE) transfer. Customer Initiated Entry (CIE) transfers are credit entry initiated by or on behalf of the holder of a consumer account to the non-consumer account of a receiver.
Consumer Payment (CIE)
indicates a variant of the Customer Initiated Entry (CIE) transfer. Customer Initiated Entry (CIE) transfers are credit entry initiated by or on behalf of the holder of a consumer account to the non-consumer account of a receiver.
Vendor Payment (CCD)
indicates a payment for an invoice received by a corporate client
Remittance (CCD)
indicates a transfer from a consumer in the United States to a recipients abroad. These recipients may include friends, family members or businesses.
Federal Tax Payment (CCD)
indicates a tax payment intended for submission to the United States Internal Revenue Service (IRS)
State/Local Tax Payment (CCD)
indicates a tax payment intended for submission to one or more State or local tax agencies. For example, the submission of a Corporate Estimated Income tax payment to the Nebraska Department of Revenue.
Re-presented Check (RCK)
indicates a re-presented check transfer, which involves a single ACH debit used by originators to re-present a check processed through the check collection system and returned due to insufficient or uncollected funds
Automated Enrollment Entry (ENR)
indicates a transfer in which a depository financial institution transmits ACH enrollment information to United States Federal Government agencies using the ACH Network. This is done in preparation for the transmission of future credit and debit applications on behalf of both consumers and companies.
Destroyed Check (XCK)
indicates a transfer in which the collecting institution completes a collection for checks have been destroyed
Corporate Trade Exchange (CTX)
the Corporate Trade Exchange application supports the transfer of funds (debit or credit) within a trading partner relationship in which a full ANSI ASC X12 message or payment related UN/EDIFACT information is sent with the funds transfer. The ANSI ASC X12 message or payment related UN/EDIFACT information is placed in multiple addenda records.
Customer Initiated Entry (CIE)
indicates a variant of the Customer Initiated Entry (CIE) transfer. Customer Initiated Entry (CIE) transfers are typically credit only transfers where the consumer initiates the transfer of the funds.
Internet Initiated Entry (WEB)
the internet initiated entry type is used for the origination of debit entries (recurring or single) to a consumer's account based on an authorization that is obtained by the receiver via the internet
Telephone Initiated Entry (TEL)
the telephone initiated entry is used for the origination of a single debit entry transaction to a consumer’s account in accordance with an oral authorization obtained from the consumer via the telephone
Commingled File
commingled files are comprised of more than one ACH transfer type
Child Support Payment (CCD)
indicates a child support payment
International ACH (IAT)
international ACH transactions are used for the transmission of International cross-border credit and debit ACH entries
ACH Pass-Thru
indicates a NACHA formatted transfer file that is imported into ACH Manager. The batches that populate the NACHA formatted transfer file may be any of the transfer types defined in the previous rows of the table. The ACH Pass-Thru Transfer Type enables financial institution clients or financial institution administrative users to indicate how individual batches are handled once the NACHA formatted transfer file is submitted for processing.
The Commingled File and ACH Pass-Thru transfer types are available only when importing a NACHA transfer without a template.
Step 2 - File Import
Once a NACHA formatted transfer file is selected and the user clicks the Next button, ACH Manager populates with the Step 2 - Import page. This page provides a summary of the transfers that comprise a transfer file and includes the ability to edit the Effective Date of individual transfers when necessary.

|
|
Once a NACHA formatted transfer file is selected for import into ACH Manager, the Step 2 - Import page displays. 
|
Transfer files utilizing effective dates that are in the past generate the warning message "Past Effective Date".
Batch ID
The batch identification number of the ACH payment being imported. A file containing multiple payments, such as a federal or state tax transfer, contains more than one Batch ID header with amount information.
Effective Date
The date placed on an ACH transfer by the originator (user or financial institution) and is normally the date the originator intends the transfer to take place.
Debit Totals
The total debit amount of the ACH batch being imported.
Credit Totals
The total credit amount of the ACH batch being imported.
Number of Debits
The total number of debits included in the ACH file being imported.
Number of Credits
The total number of credits included in the ACH file being imported.
File Debit Total
The total debit amount across all batches contained in the ACH file being imported.
File Credit Total
The total credit amount across all batches contained in the ACH file being imported.
Reference Number
This is a unique identifier that is generated by ACH Manager during the import process. The identifier can be used to search for the imported file once the import process is completed.
NACHA Formatted Transfers - ACH Pass-Thru
The ability to import NACHA formatted ACH Pass-Thru files is housed within the NACHA portion of the Import ACH Transfers functionality. The import process itself is not unlike the import process that is executed to import a transfer file populated with any of the ACH types (for example, Payroll) available for use within the ACH Manager product suite.
Step 1 - File Selection
Step 1 - File Selection is the same for ACH Pass-Thru files as it is for NACHA formatted ACH transfer files.
Step 2 - File Import
Step 2 - File Import step is unique to ACH Pass-Thru files, in that it replaces the management of effective dates with a number of options concerning how batches populating the ACH Pass-Thru file are handled. When the Step 2 - File Import page displays, it populates with a header entitled Select Batch Action - [ACH Pass-Thru File Name], where the [ACH Pass-Thru File Name] portion of the header indicates the name of the ACH Pass-Thru file that is being imported. The remainder of the page populates with the individual batches that comprise the ACH Pass-Thru file as well as a number of options that govern how the batches in the ACH Pass-Thru file are handled. The options associated with the handling of batches that populate an ACH Pass-Thru file include:
-
Discard
-
Save
-
Process
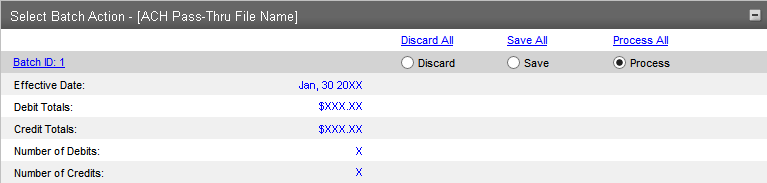
|
| The Select Batch Action page displays the options available for the handling of batches populating an ACH Pass-Thru file that is imported into ACH Manager. |
Select Batch Action - Fields
The fields that populate the Select Batch Action section are used to communicate information about a particular batch or they are actionable fields that extend the ability to manage an individual batch or all of the batches populating the ACH Pass-Thru file.
Hyperlinked Fields
There are a number of ![]() hyperlinks that appear within the Select Batch Action section.
hyperlinks that appear within the Select Batch Action section.
Batch ID
Clicking the Batch IDhyperlink associated with a batch opens a new window displaying the batch details.
Discard All
Clicking the Discard All hyperlink discards all of the batches associated with the ACH Pass-Thru file. When a batch is discarded, the information contained in that particular batch is not pulled into ACH Manager and cannot be saved or processed. In the event that a batch is discarded when in reality it should have been saved or processed, reimport the ACH Pass-Thru file and select that particular batch as a batch to be saved or a batch to be processed. In this scenario, because the previous import resulted in the saving or processing of other batches in the ACH Pass-Thru file, ensure that the batches that were already saved or processed are discarded to avoid populating ACH Manager with duplicate batches. Alternatively, individual batches can be discarded by selecting the Discard option associated with a particular batch.
Note: In the event the Discard All hyperlink is selected, ensure that one of the batches associated with the ACH Pass-Thru file is marked as a batch that is saved or a batch that is processed. If the Discard All hyperlink is selected and at least one of the batches populating that ACH Pass-Thru file is not selected as a batch to be saved or a batch to be processed, ACH Manager populates the page with an error message indicating that at least one batch must be saved or processed.

Save All
Clicking Save All hyperlink indicates that all of the batches associated with the ACH Pass-Thru file are saved to ACH Manager when the file is submitted. Batches that are saved to ACH Manager can be processed by executing a search for them using the Inquire ACH Transfer functionality. Once the batch is located in the ACH List box, open that batch by clicking on the Transfer Description hyperlink. When the details associated with that particular batch populate, click Process to submit the batch for processing. Alternatively, individual batches can be saved by selecting the Save button associated with a particular batch.
Process All
Clicking on the Process All hyperlink indicating that all of the batches associated with the ACH Pass-Thru file begin processing when the ACH Pass-Thru file is submitted. Alternatively, individual batches can be marked for processing by selecting the Process button associated with a particular batch.
Effective Date
The effective date is pulled from the batch header in the ACH Pass-Thru file. When working with ACH Pass-Thru files, the application of valid processing days is not enforced. Subsequently, ACH Pass-Thru files that are comprised of batches possessing effective dates in the past can be successfully imported into ACH Manager for processing.
Debit Totals
The total dollar amount for all of the debit entries that comprise a batch in the ACH Pass-Thru file.
Credit Totals
The total dollar amount for all of the credit entries that comprise a batch in the ACH Pass-Thru file.
Number of Debits
The total number of debit entries that comprise a batch in the ACH Pass-Thru file.
Number of Credits
The total number of credit entries that comprise a batch in the ACH Pass-Thru file.
Submission Results
Once the file import selections are made for the ACH Pass-Thru file that is being imported, select Submit to execute the import process. When the import process completes, ACH Manager populates the ![]() processing results page with information related to the batches selected for processing and the batches selected for saving.
processing results page with information related to the batches selected for processing and the batches selected for saving.
The information populating the processing results page includes the following elements:
Section
Description
Header
The Success header communicates the batches in the ACH Pass-Thru file that were saved and the batches in the ACH Pass-Thru file that were processed. The information is displayed in the format [ACH Pass-Thru File Name].ACH_X and is appended with the appropriate value to the end of the file name indicating whether the batch was processed or saved.
Batches submitted for process
When batches are selected for processing, the processing results page populates with the subsection [ACH Pass-Thru File Name] submitted for process.
ACH Pass-Thru File Name - indicates the name of the Pass-Thru file imported into ACH Manager. For example, My_Financial_Pass_Thru.
The information populating this subsection represents a summary of the batches selected for processing. Values are:
Debit Totals
indicates the dollar amount total for the debit entries included in the batches selected for processing
Credit Totals
indicates the dollar amount total for the credit entries included in the batches selected for processing
Number of Debits
indicates the total number of debit entries included in the batches selected for processing
Number of Credits
indicates the total number of credit entries included in the batches selected for processing
Reference Number
This is a unique identifier that is generated by ACH Manager during the import process. The identifier can be used to search for the imported file once the import process is completed.
X files submitted for save
When batches are selected for saving, the processing results page populates with the subsection X files submitted for save.
- X files submitted for save - indicates the number of batches selected for saving.
The information populating this subsection represents a breakdown of the individual batches selected for saving. Values are
File Name
indicates the name of the ACH Pass-Thru file that was imported and the batch number that was selected for saving. For example, [ACH Pass-Thru File Name].ACH_X.
- [ACH Pass-Thru File Name] - indicates the name of the Pass-Thru file imported into ACH Manager. For example, My_Financial_Pass_Thru.
- ACH_X - indicates the batch that was processed or saved. For example, Batch 1.
Debit Totals
indicates the dollar amount total for the debit entries included in the batch selected for saving. The number of debit entries associated with the batch selected for saving is indicated by the numeric value within the parentheses (X) that follow the dollar amount total. For example, (5) would indicate that the batch was comprised of 5 debit entries.
Credit Totals
indicates the dollar amount total for the credit entries included in the batch selected for saving. The number of credit entries associated with the batch selected for saving is indicated by the numeric value within the parentheses (X) that follow the dollar amount total. For example, (5) would indicate that the batch was comprised of 5 credit entries.
Reference Number
indicates a unique identifier that is generated by ACH Manager during the import process. The identifier can be used to search for the imported file once the import process is completed.
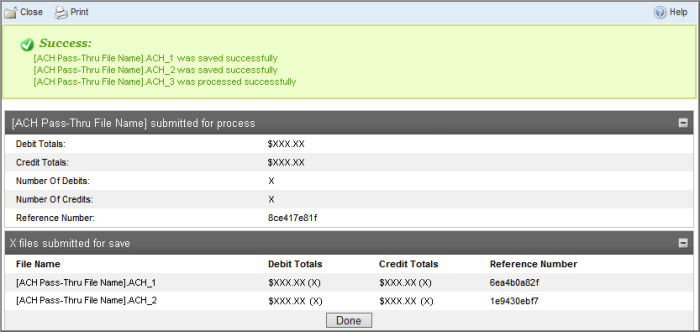
|
The processing results page displays information related to batches selected for processing and batches selected for saving.
Non NACHA Formatted Transfers
Step 1 – File Selection
Once the file import process is initiated, the user interface populates with the first of several steps that are required to successfully import a non NACHA formatted ACH transfer. The fields that display are governed by the user's association with any established ACH transfer templates.

File Location
The directory path where ACH transfer files, correctly formatted and containing stored values, are located for import. To select a file for import, click Browse, navigate to the appropriate folder directory and select the ![]() transfer file for import.
transfer file for import.
The selected file must be in the correct format for the import type or ACH Manager displays the message, "Invalid record type in file" and stops the import process. To continue, click Browse and select a file formatted to match the import type.
Template
The ![]() template against which the imported transfer file is validated. The list contains only those templates matching the current import type to which the current user has access. If the ACH user does not have access to any templates, the Template field does not display.
template against which the imported transfer file is validated. The list contains only those templates matching the current import type to which the current user has access. If the ACH user does not have access to any templates, the Template field does not display.
Selecting an established template in the Template drop-down list automatically populates the Tax Identification Number and Transfer Type fields, and displays the Amount Range field when the range is defined in the template.
If the selected template contains required fields (for example, Required Funding Transactions) whose values are missing from the selected transfer file, ACH Manager displays the message, "File is not as per the selected format".
The Template field displays only if the current user has access to at least one stored NACHA template.
Step 2 – Template Details
Once a non NACHA file is selected for import, you can assign identification attributes to the file, define the type of file being imported and specify which users are authorized to access the transfer file.
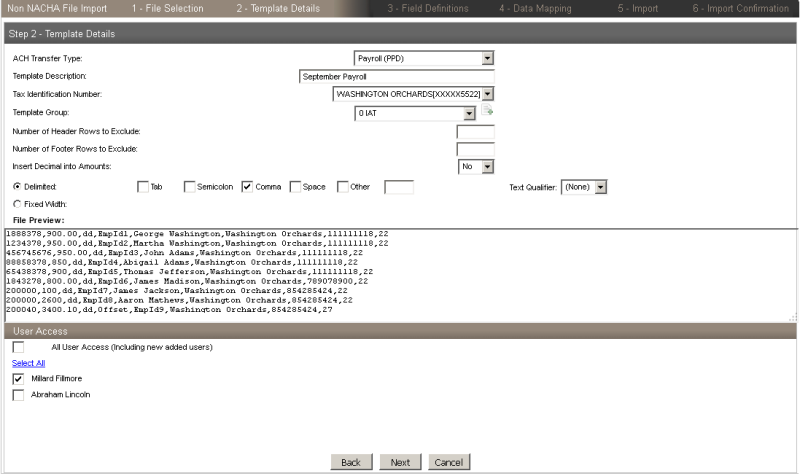
ACH Transfer Type
The ACH Transfer Type field appears as a drop-down list from which you can select the ![]() type of transfer that will be imported.
type of transfer that will be imported.
Payroll (PPD)
indicates a payroll transfer that originates from an account at an employer's financial institution and is deposited to an account at an employee's financial institution
Prearranged Deposit (PPD)
indicates a prearranged deposit transfer credit application that transfers funds into a consumer’s account at the Receiving Depository Financial Institution (RDFI)
Prearranged Payment (PPD)
indicates a prearranged payment transfer debit application. For example, monthly payments of household utility bills can be collected using this transfer type.
HSA Contribution (PPD)
indicates a Health Savings Account (HSA) contribution transfer
Corporate Credit (CCD)
indicates a business to business transaction in which funds are transferred from one organization to another. In this case, the originator receives an authorization from the receiver, giving the originator permission to send a credit entry to their business account.
Corporate Debit (CCD)
indicates a business to business transaction in which funds are transferred from one organization to another. In this case, the originator receives an authorization from the receiver, giving the originator permission to send a debit entry to their business account.
Consumer Deposit (CIE)
indicates a variant of the Customer Initiated Entry (CIE) transfer. Customer Initiated Entry (CIE) transfers are credit entry initiated by or on behalf of the holder of a consumer account to the non-consumer account of a receiver.
Consumer Payment (CIE)
indicates a variant of the Customer Initiated Entry (CIE) transfer. Customer Initiated Entry (CIE) transfers are credit entry initiated by or on behalf of the holder of a consumer account to the non-consumer account of a receiver.
Vendor Payment (CCD)
indicates a payment for an invoice received by a corporate client
Remittance (CCD)
indicates a transfer from a consumer in the United States to a recipients abroad. These recipients may include friends, family members, or businesses.
Federal Tax Payment (CCD)
indicates a tax payment intended for submission to the United States Internal Revenue Service (IRS)
State/Local Tax Payment (CCD)
indicates a tax payment intended for submission to one or more state or local tax agencies. For example, the submission of a Corporate Estimated Income tax payment to the Nebraska Department of Revenue.
Re-presented Check (RCK)
indicates a re-presented check transfer, which involves a single ACH debit used by originators to re-present a check processed through the check collection system and returned due to insufficient or uncollected funds
Automated Enrollment Entry (ENR)
indicates a transfer in which a depository financial institution transmits ACH enrollment information to United States Federal Government agencies using the ACH Network. This is done in preparation for the transmission of future credit and debit applications on behalf of both consumers and companies.
Destroyed Check (XCK)
indicates a transfer in which the collecting institution completes a collection for checks have been destroyed
Corporate Trade Exchange (CTX)
the Corporate Trade Exchange application supports the transfer of funds (debit or credit) within a trading partner relationship in which a full ANSI ASC X12 message is sent or payment related UN/EDIFACT information is sent with the funds transfer. The ANSI ASC X12 message or payment related UN/EDIFACT information is placed in multiple addenda records.
Customer Initiated Entry (CIE)
indicates a variant of the Customer Initiated Entry (CIE) transfer. Customer Initiated Entry (CIE) transfers are typically credit only transfers where the consumer initiates the transfer of the funds.
Internet Initiated Entry (WEB)
the internet initiated entry type is used for the origination of debit entries (recurring or single) to a consumer's account based on an authorization that is obtained by the receiver via the internet
Telephone Initiated Entry (TEL)
the telephone initiated entry is used for the origination of a single debit entry transaction to a consumer’s account in accordance with an oral authorization obtained from the consumer via the telephone
Commingled File
commingled files are comprised of more than one ACH transfer type
Child Support Payment (CCD)
indicates a child support payment
International ACH (IAT)
international ACH transactions are used for the transmission of International cross-border credit and debit ACH entries
ACH Pass-Thru
indicates a NACHA formatted transfer file that is imported into ACH Manager. The batches that populate the NACHA formatted transfer file may be any of the transfer types defined in the previous rows of the table. The ACH Pass-Thru Transfer Type enables financial institution clients or financial institution administrative users to indicate how individual batches are handled once the NACHA formatted transfer file is submitted for processing.
The Commingled File and ACH Pass-Thru transfer types are available only when importing a NACHA transfer without a template.
Template Description
Enter the name of the file import.
Tax Identification Number
The tax identification number of the account owner at the Originating Depository Financial Institution (ODFI). This field populates as a drop-down list in the event there are multiple account owners associated with a given account. For example, George and Martha Washington are tied to the account servicing Washington Orchards. Subsequently, their respective tax identification numbers would populate the Tax Identification Number.
Template Group
The template group to which the template belongs. Click ![]() to add a new template group or select an existing template group from the drop-down list.
to add a new template group or select an existing template group from the drop-down list.
Number of Header Rows to Exclude
The number of header rows at the beginning of the file that are excluded during file import.
Number of Footer Rows to Exclude
The number of footer rows at the end of the file that are excluded during file import.
Insert Decimal into Amounts
Indicates that a ![]() decimal can be inserted into the amount.
decimal can be inserted into the amount.
Yes
indicates the decimal is inserted to the right most digits of an amount
No
indicates the decimal is not inserted
Delimited
Indicates the imported file format is Delimited. If the Delimited option is selected, you can further specify the type of delimited ![]() format used in the imported file.
format used in the imported file.
Tab
indicates the file delimiter is a tab
Semicolon
indicates the file delimiter is a semicolon
Comma
indicates the file delimiter is a comma
Space
indicates the file delimiter is a space
Other
indicates the file delimiter is other than a space
Fixed Width
Indicates that every field in the template has a fixed, defined width, with shorter values being padded with characters. This option produces a file format preview with column headers in Step 3 - Field Definitions. Selecting this option overrides any selections in the Delimited field, as files are either delimited or fixed width.
File Preview
The preview of the ACH file format.
If any value required for the selected ACH transfer type is not defined in the imported ACH file, it needs to be defined in the Apply Additional Values to File section. The Apply Additional Values to File section may display below the File Preview section as it depends on the type of file being imported.
User Access
The ACH Manager users that have ![]() access to view, inquire, change, and delete the template, as well as review transfers originated using the template. The User Access settings also control who can import files using the template.
access to view, inquire, change, and delete the template, as well as review transfers originated using the template. The User Access settings also control who can import files using the template.
All User Access (including new added users)
indicates that all users have access to the template and transfers imported using the template, including future users
Select All
indicates that all users currently listed in the User Access section have access to the template and transfers imported using the template
[User Name]
indicates that only users selected in this section have access to the template and transfers imported using the template
New employees added to the company after the template was established must be manually selected in this section by changing the template before they have access to the template or transfers established from it.
Step 3 – Field Definitions
The Field Definitions sections enables you to assign each piece of data in the non NACHA file a data type, assign any offset specifications, and define effective date options.

Layout Preview
The preview of the ACH file format. If the imported file contains data in columns, Layout Preview displays a drop-down list for each numbered column; select each column's data type from the "Column" N drop-down list.
N = the column number
The data type varies by the ACH transfer type specified for the template. If only a single column displays in Layout Preview, define the data types in the Apply Additional Values to File section.
If any value required for the selected ACH transfer type is not defined in the imported ACH file, it needs to be defined in the Apply Additional Values to File section.
Offset Account Defined In File
Indicates whether the offset account is defined within the import file.
Add Offset Account to File
Indicates whether the offset account is added into the import file.
Select Account
Indicates the list of accounts that a user has access to.
Date In File
Indicates whether the effective date is defined within the import file.
Prompt For Date
Indicates whether the ACH user is prompted for the effective date during the file import process.
Default Current Business Date
Indicates whether the current business date is added into the file during the import process.
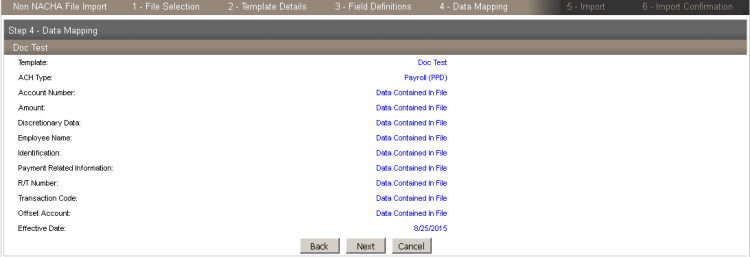
Step 4 – Data Mapping
Once each piece of data in the non NACHA file is assigned a data type, Step 4 – Data Mapping provides an overview and confirmation that the data will be mapped. In the event that a data type is incorrectly assigned, an error message displays. You can click the Back button to make any necessary edits.
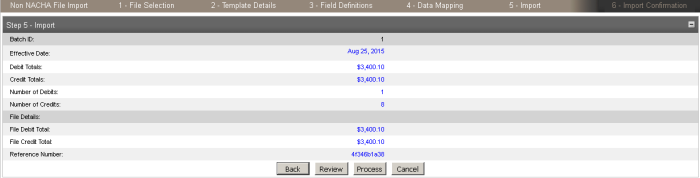
Step 5 – Import
The Step 5 – Import section enables you to review the batch and file detail information prior to submitting the batch for processing.
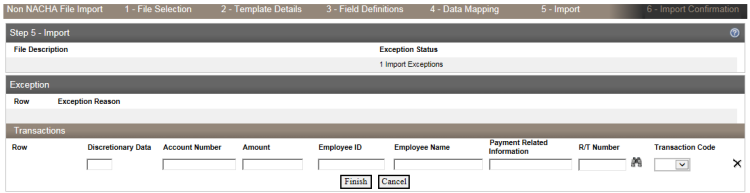
Exceptions
The system displays the Exceptions page when you import a Non-NACHA file and the data in the file is missing (for example, the dollar amount or the routing transit number is blank). Once you fix the exceptions and click Continue, the system continues with the import process.
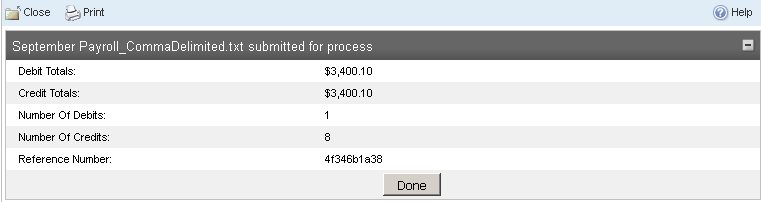
Transfer Details Review
If the data is imported successfully, a confirmation box appears listing the Debit Totals, Credit Totals, Number Of Debits, Number Of Credits and Reference Number.
See Also:
Import a NACHA File Without Using a Template
Import a NACHA File Using a Template
Import a Non NACHA File Using an Existing Template
Import a Non NACHA File Using a New Template
Back to Top