You can use this feature to generate log reports and audit reports. Log reports and audit reports communicate the following information to the reader:
- Log reports communicate who accessed a particular record in Access Manager and for what reason.
- Audit reports communicate who accessed a particular record in Access Manager and what changes they made to that record.
- Both report types include an Audit Reference Number. You can use this number to reference another report that corresponds to the one that you are currently viewing
We have broken up the discussion of audit and log reports in to smaller topics that focus on a particular feature or report. Click one of the topic links to display the information about that topic. When you complete your review of that particular topic, you can click the topic link again to close it.
Log Reports – Overview
Log reports communicate the following pieces of information:
- The user who accessed a record.
- When the report was generated and when the user accessed a record.
- The record (for example, Client Default) that a user accessed.
- The activity that the user completed (for example, New Client Default).
To assist you with understanding how the system communicates this information, we have broken up this discussion of log reports in to the following sections:
|
Log Reports |
|---|
|
Log Reports – User Information |
|
Log Reports – Date and Time |
|
Log Reports – Activity |
Back to Top
Log Reports – User Information
When you generate a log report the system populates the report with user information in the User/Client Name column of the report. This information communicates the user who completed an activity (for example, New Client Default).

For example, if the financial institution administrative user George Washington signs in to Access Manager and establishes several new client default records; the system lists George Washington in the User/Client Name column of the log report.
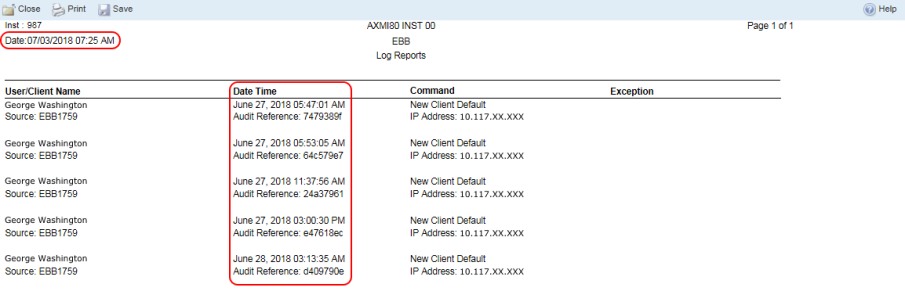
Log Reports – Date and Time
The Date and Time fields indicate the date and time when a user completed an activity in Access Manager.
For example, if a financial institution administrative user signs in to Access Manager; opens the log report feature; generates a log report for New Client Default; the system adds two dates to the log report.
- The date in the header of the report indicates the date and time when the financial institution administrative user generated the log report.
- The date column in the body of the report indicates the date and time when a user made a change to the record that the system lists in the report. For example, George Washington generated a New Client Default record on June 27, 2018 at 5:47 AM.
Back to Top
Log Reports – Activity
When you generate a log report the system populates the report with activity information in the Command column of the report. The information in this column communicates the activity that a particular user completed when they signed in to Access Manager in addition to the IP address of the workstation that the user signed in from. For example, if a financial institution administrative user signed in to Access Manager and setup a new client default record; the system would record this activity as New Client Default.
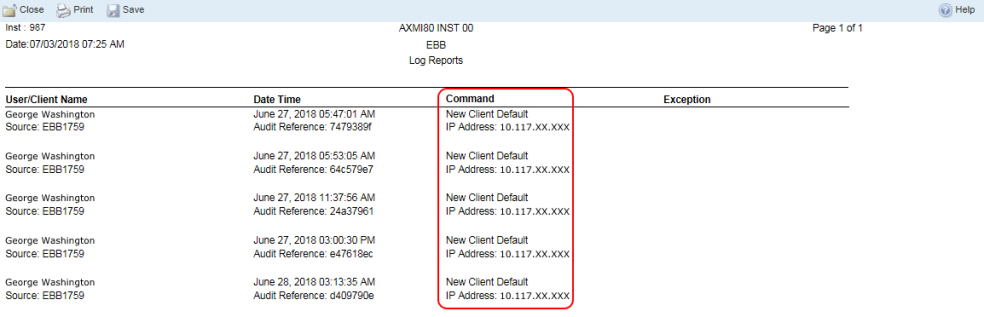
The types of activities that the system will populate a log report with include the following:
- New activities. For example, establishing a new employee record.
- Change activities. For example, modifying a field value on an existing employee record.
- Deletion activities. For example, deleting an employee record.
- New using existing activities. For example, establishing a new employee record by using an existing employee record.
- Inquiry activities. For example, reviewing an employee record
If a user signs in to Access Manager, opens a record to make changes (for example, an employee record), closes that record without saving their changes, the system adds this activity to the log report as an inquiry activity. If a user signs in to Access Manager and completes an activity (for example, modifying an employee record), the system logs this activity as a single event. For example, if you save your changes to an existing employee record, the system logs this event as a change activity and not an inquiry and change activity.
Back to Top
Audit Reports – Overview
Audit reports communicate the following pieces of information:
- When the report was generated and when the user accessed a record.
- The activity that the user completed (for example, New Client Default).
- The user who accessed a record and made a change.
- The changes that a user made to the fields on the record that the user accessed.
To assist you with understanding how the system communicates this information in the audit reports, we have broken up this discussion in to the following sections:
|
Audit Reports |
|---|
|
Audit Reports – Date and Time |
|
Audit Reports – Activity |
|
Audit Reports – User Information |
|
Audit Reports – Changes to Field Values |
Back to Top
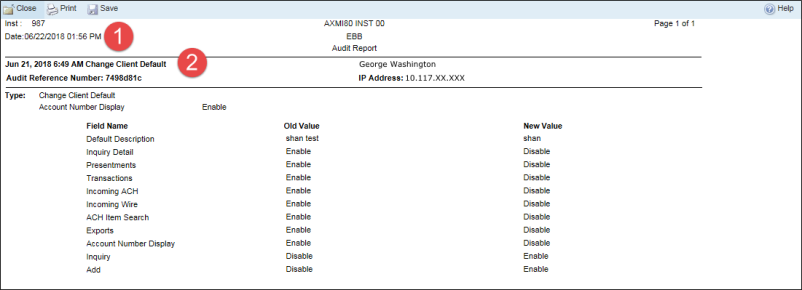
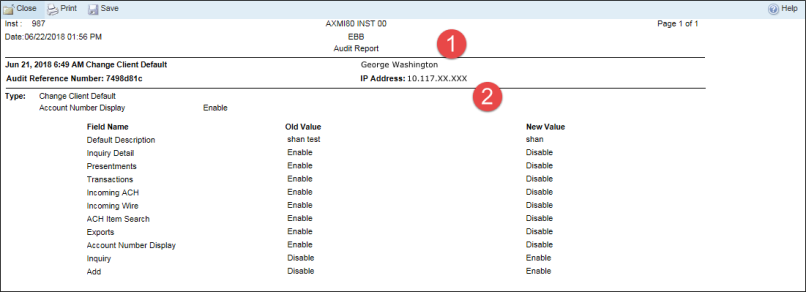
Audit Reports – Date and Time
The Date and Time fields indicate the date and time when a user completed an activity in Access Manager.
For example, if a financial institution administrative user signs in to Access Manager; opens the audit report feature; generates an audit report for Change Client Default; the system adds two dates to the audit report
- The date in the header of the report indicates the date and time when the financial institution administrative user generated the audit report.
- The date in the body of the report indicates the date and time when a user made the change to the record and specifications that the system lists in the report. For example, George Washington updated a client default record on June 21, 2018 at 6:49 AM.
Back to Top
Audit Reports – Activity
When you generate an audit report the system populates the report with activity information in the header and the body of the report. This information communicates the record that a user made changes to. The types of activities that the system will populate an audit report with include the following:
- New activities. For example, establishing a new employee record.
- Change activities. For example, modifying a field value on an existing employee record.
- Deletion activities. For example, deleting an employee record.
- New using existing activities. For example, establishing a new employee record by using an existing employee record.
For example, if a financial institution administrative user signs in to Access Manager; opens the audit report feature; generates an audit report for Change Client Default; the system adds the verbiage Change Client Default to two locations in the audit report.
- The system adds the activity that a user completed (for example, Change Client Default) to the header section of the audit report.
- The system adds the activity that a user completed (for example, Change Client Default) to the Type field in the body of the audit report.

Back to Top
Audit Reports – User Information
When you generate an audit report the system populates the report with user information in the header of the report. This information communicates the user who made changes to the record in addition to the IP address of the location that the user accessed the system from.
For example, if the financial institution administrative user George Washington signs in to Access Manager; opens the audit report feature; generates an audit report for Change Client Default; the system adds the following pieces of information to the header of the audit report:
- The system adds the name of the user (for example, George Washington) that made the change to the client default record to the header section of the audit report.
- The system adds the IP address (for example, 10.117.XX.XXX) of the location that George Washington used to make the change to the client default record to the IP Address field in the header section of the audit report.
Back to Top
Audit Reports – Changes to Field Values
When a user signs in to Access Manager and complete one of the following activities:
- New activities. For example, establishing a new employee record.
- Change activities. For example, modifying a field value on an existing employee record.
- Deletion activities. For example, deleting an employee record.
- New using existing activities. For example, establishing a new employee record by using an existing employee record.
The system adds three columns to the body of the report. The columns that the system adds to the report include the following:
- Field Name
- Old Value
- New Value
Field Name
The name of the fields that the system includes on a particular record.
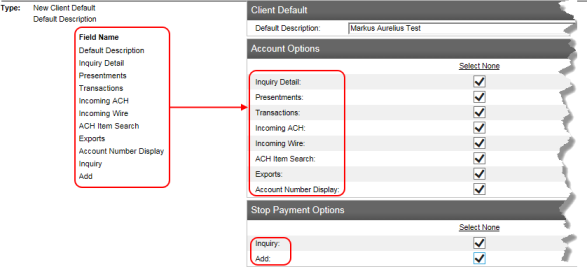
For example, Default Description is one of the fields that you can manage on a client default record. The system populates an audit report with the fields that an administrative user established or modified when they were working with the record in Access Manager.
Example 1:
The following image illustrates an audit report detailing the creation of a new client default record. Notice that the system populated the Field Name column with all of the fields that the system presents on a client default record. The system included all of these client default fields because the user worked with all of them during the set up process.
Similar to establishing a record, deleting a record affects all of the fields on that record. Consequently, if you delete a record, the system populates the Field Name column with all of the fields that the system presents on that particular record.
Example 2:
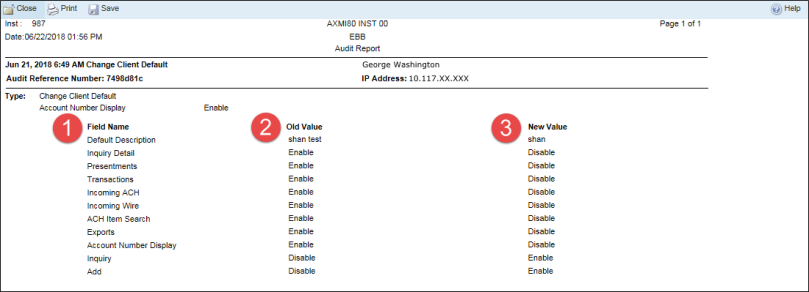
The following image illustrates an audit report detailing the modification of a client default record. Notice that the system populated the Field Name column with only the fields that the user modified.
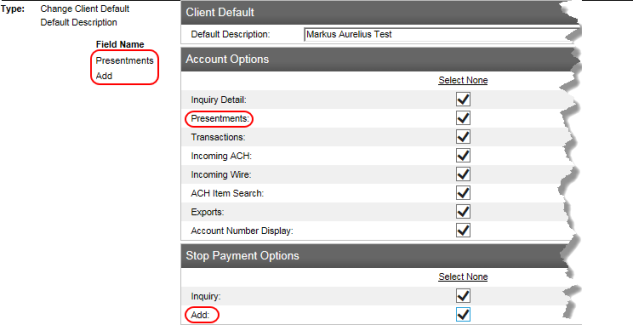
Old Value and New Value
The values in these columns communicate the original and the new values that the system associates with a particular field on a record.
Example 1:
The following image illustrates an audit report detailing the creation of a new client default record. Notice that the system populated the Old Value column with no information while it populated the New Value column with the values that the user established during the set up process.

Example 2:
The following image illustrates an audit report detailing the modification of a client default record. Notice that the system populated the Old Value column with the original value and the New Value column with the new value. In this case, the user disabled the Presentments option and the Add stop payments option.
![]()
Back to Top
Report Specifications – Overview
Report specifications extend the ability to query the system for information about changes to records that you can manage in Access Manager. These specifications provide you with the flexibility to generate reports that are broad or narrow.
To assist you with understanding how the system communicates this information, we have broken up this discussion of report specifications in to the following subsections:
|
Report Specifications |
|---|
|
Report Specifications – Data Center Specific Fields |
|
Report Specifications – Product, Source, and Command |
|
Report Specifications – Additional Fields |
|
Report Specifications – Sorting |
|
Report Specifications – Generating a Report |
Back to Top
Report Specifications – Data Center Specific Fields
When a user signs in to Access Manager as a data center user (that is, Institution DC), Access Manager includes two additional options on the Log Report Specifications and the Audit Report Specifications pages.
- Routing Transit Number
- Institution Reporting Number

When you are working in an environment with multiple institutions, you can use these options to narrow the results that you review after you generate a log report or an audit report.
For example, you can use these specifications to generate a report listing all of the record changes for all of the institutions in your environment or you can narrow the specifications to generate a report for listing the record changes that you associate with Institution 00.
The system populates these drop-down lists with the routing transit and institution reporting numbers that you have established institution records for in Access Manager (that is, records that you established in the Institution > Access Manager Institution specifications).
Back to Top
Report Specifications – Product, Source, and Command
The Product, Source, and Command options extend the ability query the system for information about changes to records that you associate with a specific product (for example, Access Manager) product program (for example, EBB1759) and a product program activity (for example, New Client Default).


The first image is an example of the Source and Command options as they appear on the report specifications page when you sign in to Access Manager as a financial institution user (for example, Institution 01). The second image is an example of the Source and Command options as they appear on the report specifications page when you sign in to Access Manager as a data center user (that is, as institution DC).
Where do these values come from?
The system references the Shared Audit and Log (XAL) database before populating these drop-down with product programs and the associated program activities. Consequently, the system will expand or contract the values in these lists depending upon the products that you have licensed for use and installed.
What do the Product values indicate?
The values that the system populates the drop-down in the Product option correspond with a specific product (for example, Access Manager or ACH Manager). Selecting a value from this drop-down limits the programs that the system populates in the Source option to the programs that it associates with a specific product. For example, if you select Access Manager from the Product option, the system limits the programs that appear in the Source option to just those programs that it associates with Access Manager (for example EBB1759, EBB1757, or SSM1752).
What do the Source values indicate?
The values that the system populates in the Source drop-down correspond with a specific product program. For example, EBB1759 is the Access Manager Institution Administrator program. In this example, selecting EBB1759 would narrow your log or audit report query to just those activities that users can complete by using the EBB1759 program.
What do the Command values indicate?
The values that the system populates in the Command drop-down correspond with activities that users can complete in a product program. For example, New Client Default is an activity that users can complete in Access Manager by using the EBB1759 program.
Selecting a value from the Source drop-down narrows the values that populate in the Command drop-down.

Do I always have to use a combination of Product, Source, and Command to generate reports?
If you are not familiar with the programs that the system populates in the Source drop-down, you can use the Product drop-down or a combination of the Product and Command drop-downs to filter the results that the system generates in a log report or an audit report.
- Example 1: If you select Access Manager from the Product drop-down and click Submit; the system generates a log or audit report for all of the activities completed by users in Access Manager for the current date.
- Example 2: If you select Access Manager from the Product drop-down, New Client Default from the Command drop-down, and click Submit; the system generates a log or audit report for all of the new client default activities completed by users in Access Manager for the current date.
Back to Top
Report Specifications – Additional Fields
The remaining fields on the Report Specifications page support your ability to generate log reports and audit reports by specifying one or more of the following identifiers that the system associates with the user that reviewed or modified a record (for example, New ACH User).
- Client Number
- Client Name
- Access ID
- User Name
- Date Range
- IP Address
Client Number
Typing a value in this field allows you to search for and generate reports based on the client number that the system associates with the user who completed an activity on a record.
Client Name
Typing a value in this field allows you to search for and generate reports based on the client name that the system associates with the user who performed a review or revision on a record.
Access ID
Typing a value in this field allows you to search for and generate reports based on the Access ID that the system associates with the user who performed a review or revision on a record.
User Name
Typing a value in this field allows you to search for and generate reports based on the name of the user who completed an activity on a record. For example, if you typed George Washington in the User Name field, the system generates log or audit reports for the activities that George Washington completed in Access Manager (for example, New Client Default).
Date Range
Range of dates from which you want the system to search for activities that it populates a log or an audit report with. The value that you establish in the Audit Duration Days field on the Shared Audit and Log Institution Specifications page (that is, sign in as a DC user > Products > Audit and Log) determines the range of history that the system can pull from when you generate a report. Establishing a value of 0 in this field indicates that the system retains audit and log information indefinitely.

IP Address
Typing a value in this field allows you to search for and generate reports based on the IP address of the workstation that the user used to sign in to Access Manager and complete an activity on a record. For example, if George Washington used workstation 10.123.45.678 to sign in to Access Manager for the purposes of managing various records; then typing 10.123.45.678 in the IP Address field focuses the system’s search for activities to just those occurrences involving that specific IP address.
Back to Top
Report Specifications – Sorting Your Results
At this time, you can only sort results by using the default Date option.
This option sorts the results by date and time. For example, if you selected a range of 12/21/2018 through 01/23/2019; then the system would order the report so that activities (for example, Change Client Default) occurring on 12/21/2018 (for example, Dec 21, 2018 00:01 A.M.) would appear at the top of the report and activities occurring on 01/23/2019 (for example, Jan 2, 2019 2:45 P.M.) would appear at the end of the report.
By default the system populates the Date Range fields with the current date. If you want to generate a report for additional days, ensure that you update the first Date Range field to include a date that you want the system to begin searching from when it generates a report.

In a future release, we intend to expand the Sort by feature to include the ability to sort report results by date, employee name, branch, and user name.
Back to Top
Report Specifications – Generating a Report
You can generate audit or log reports when you sign in to Access Manager as a data center user (that is, as institution DC) or as a financial institution user (for example, as institution 01). The following example highlights how to use this feature to generate an audit report.
![]() Generating a Report as a Data Center User
Generating a Report as a Data Center User
- Sign in to Access Manager as a data center user (that is, as institution DC). The Access Manager home page appears.
- On the menu, expand Reports and click Audit Reports. The Audit Report Specifications page appears.
- If you know a specific routing transit number that you associate with a specific financial institution that you want to generate an audit report for, select that number from the Routing Transit Number drop-down.
- If you know a specific institution reporting number that you associate with a specific financial institution that you want to generate an audit report for, select that number from the Institution Reporting Number drop-down.
If you don't know the routing transit number or the institution reporting number for a specific financial institution, you can find this information by going to Institution > Access Manager Institution. The system populates the institution list with financial institution records that you have in your environment. The reporting number for each financial institution appears in the Institution Reporting Number column. If you click the name link for a financial institution record, the system opens that record. Once the record opens, you can find the routing transit number for that institution in the first section of the record.
- If you want to narrow the scope of your audit report to a specific product (for example, Access Manager), select the name of the product from the Product drop-down.
- If you want to narrow the scope of your audit report further, select the program mnemonic from the Source drop-down.
When you specify a product by using the Product drop-down, the system narrows the options in the Source drop-down to just those programs that comprise a specific product. For example, if you select Access Manager from the Product drop-down, the system populates the Source drop-down with the programs that comprise Access Manager (for example, EBB1757 or SSM1754).
- If you want to narrow the scope of your audit report even further, select the activity (for example, New Client Default) that you want to focus on from the Command drop-down.
When you specify a source by using the Source drop-down, the system narrows the options in the Command drop-down to just those activities that you can complete by using the program that you selected from the Source drop-down. For example, establishing a new client default record is an activity that you can only complete by using the EBB1759 program. Consequently, if you select EBB1759 from the Source drop-down; New Client Default is one of the activities that the system includes in the Command drop-down.
- As needed, use the Client Number, Client Name, Access ID, User Name, and IP Address fields to focus your search around specific users that made a change to a product specification.
- Select
 in the first date field to establish a starting date for your report.
 - Select in the To date field to establish an ending date for your report.
- Review your specifications and click Submit. The system displays your audit report.
- As needed, click Archive in the report toolbar to generate a text file with your report results.
The time zone reflected is the time zone you have registered against that particular institution.
Selecting this option generates a text file output of the report in the C:\ITI\XAL\Reports directory on the server where you installed the Shared Audit and Log Administrator (XAL1751) program.
- As needed, click View PDF in the report toolbar to open or save a PDF copy of your report.
- When you complete your review of the report, click Close to exit the report and return the Audit Report Specifications page.
- Repeat steps 3 through 14 to generate another audit report.
If you want to generate a log report, return to step 2 and click Log Reports on the Reports menu. Once you open the Log Report Specifications page, complete steps 3 through 14 to generate a log report.
![]() Generating a Report as an Institution User
Generating a Report as an Institution User
- Sign in to Access Manager as an institution user (for example, as institution 01). The Access Manager home page appears.
- On the menu, expand Reports and click Audit Reports. The Audit Report Specifications page appears.
- If you want to narrow the scope of your audit report to a specific product (for example, Access Manager), select the name of the product from the Product drop-down.
- If you want to narrow the scope of your audit report further, select the program mnemonic from the Source drop-down
When you specify a product by using the Product drop-down, the system narrows the options in the Source drop-down to just those programs that comprise a specific product. For example, if you select Access Manager from the Product drop-down, the system populates the Source drop-down with the programs that comprise Access Manager (for example, EBB1757 or SSM1754).
- If you want to narrow the scope of your audit report even further, select the activity (for example, New Client Default) that you want to focus on from the Command drop-down.
When you specify a source by using the Source drop-down, the system narrows the options in the Command drop-down to just those activities that you can complete by using the program that you selected from the Source drop-down. For example, establishing a new client default record is an activity that you can only complete by using the EBB1759 program. Consequently, if you select EBB1759 from the Source drop-down; New Client Default is one of the activities that the system includes in the Command drop-down.
- As needed, use the Client Number, Client Name, Access ID, User Name, and IP Address fields to focus your search around specific users that made a change to a product specification.
- Select in the first date field to establish a starting date for your report.
- Select in the To date field to establish an ending date for your report.
- Review your specifications and click Submit. The system displays your audit report.
- As needed, click Save in the report toolbar to open or save a PDF copy of your report.
The time zone reflected is the time zone you have registered against that particular institution.
- When you complete your review of the report, click Close to exit the report and return the Audit Report Specifications page.
- Repeat steps 3 through 11 to generate another audit report.
If you want to generate a log report, return to step 2 and click Log Reports on the Reports menu. Once you open the Log Report Specifications page, complete steps 3 through 11 to generate a log report.
See Also:
Configuring Shared Audit and Log
Back to Top
Shared Audit and Log Administrator 2.0
Fiserv Confidential | Intended Only for Fiserv Shared Audit and Log Clients ©2009 -2021 Fiserv, Inc.