This topic addresses the specifications that you need to establish to use the features in Shared Audit and Log. Additionally, this topic assumes that you have already completed the installation of the programs that we include with Shared Audit and Log. Consequently, the focus of this topic is on the following areas:
- Security Control Module (SCM) function codes and their relationship with Shared Audit and Log features
- Establishing Shared Audit and Log institution specifications
- Saving Audit and Log Reports
 Security Control Module (SCM)
Verify Your SCM Function Codes
Complete the following steps to ensure that you have the SCM function codes established that support your use of the features in Shared Audit and Log.
- Sign in to Navigator using institution DC (indicating Data Center). The Navigator home page appears.
- On the Navigator menu, expand Security Control Module and On-Line Security; then select Change User Access2. The Security Control Module box appears.
- Type the User Code or Access Code that you want to modify and click Submit. The SCM Center Access2 Specifications appear.
- Use the following table to verify that you have established the function code values that you want to use.
|
Code |
Function |
||||||||
|---|---|---|---|---|---|---|---|---|---|
|
XAL Function 01 |
This function code corresponds with the Institution Specifications page (that is, Sign in as DC > Products > Audit and Log). You can establish the following values in this field:
|
||||||||
|
XAL Function 02 |
This function code corresponds with the Log Report Specifications page (that is, Sign in as DC > Reports > Log Reports). You can establish the following values in this field:
|
||||||||
|
XAL Function 03 |
This function code corresponds with the Audit Report Specifications page (that is, Sign in as DC > Reports > Audit Reports). You can establish the following values in this field:
|
- When you complete your review of these function codes, click Update.
- Repeat steps 3 through 5 for all of your applicable user codes.
- On the Navigator menu, expand Security Control Module > On-Line Security > User Code/Access Code Specifications > Change; then select User4. The Security Control Module box appears.
- Type the User Code or Access Code that you want to modify and click Submit. The SCM User4 Specifications appear.
- Use the following table to verify that you have established the function code values that you want to use.
|
Code |
Function |
||||||||
|---|---|---|---|---|---|---|---|---|---|
|
XAL Function 07 |
For future use. |
||||||||
|
XAL Function 08 |
This function code corresponds with the Log Report Specifications page (that is, Sign in as Institution > Reports > Log Reports). You can establish the following values in this field:
|
||||||||
|
XAL Function 09 |
This function code corresponds with the Audit Report Specifications page (that is, Sign in as Institution > Reports > Audit Reports). You can establish the following values in this field:
|
||||||||
|
XAL Functions 10 through 12 |
For future use. |
- When you complete your review of these function codes, click Update.
- Repeat steps 7 through 10 for all of your applicable user codes.
- Click Home to exit the Security Control Module specifications.
Shared Audit and Log Institution Specifications
Establish Institution Specifications
Complete the following steps to establish institution specifications that support use of the reporting features in Shared Audit and Log.
- Sign in to Access Manager as a data center user (that is, using Institution DC). The Access Manager home page appears.
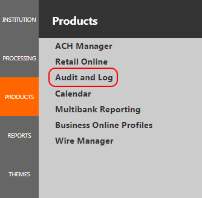
- On the menu, expand Products and click Audit and Log. The Institution Specifications page appears.
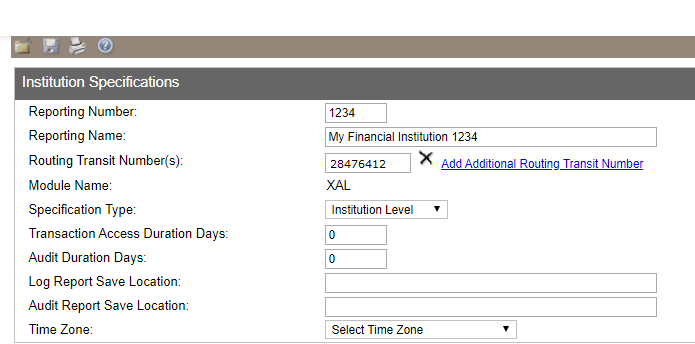
- Select New and click Submit. A new specifications record appears on the page.
- In the Reporting Number field, type the reporting number that the system associates with the financial institution that you want to establish reporting for. For example, 1234.
- In the Reporting Name field, type the name of the financial institution that you want to establish reporting for. For example, MyFinancial Inst 1234.
- In the Routing Transit Number field, type the routing transit number that you associate with the financial institution that you want to establish reporting for. For example, 28476412.
If you want to establish more than one routing transit number for a financial institution, click the Add Additional Routing Transit Number hyperlink.
- Click the Specification Type menu and select the record type that you want to associate with this new institution specifications record. For example, Institution Level.
- In the Transaction Access Duration Days field, type a value of 0.
- In the Audit Duration Days field, type a value of 0.
- In the Time Zone drop down, select your time zone or the time zone you want to have in the generated reports.
The value that you establish in this field determines the range of history that the system can pull from when you generate a report. Establishing a value of 0 in this field indicates that the system retains audit and log information indefinitely.
- Review the specifications that you established and click
 to save the record. The Institution Specifications page appears.
- Repeat steps 3 through 10 to establish additional specification records.
Saving Audit and Log Reports
Shared Audit and Log reporting includes three features that enable you to save an audit or log report.
- Archiving Reports
- View PDF
- Save
Archiving Reports – Data Center Only
When you sign in to Access Manager as a data center user (that is, as institution DC); audit and log report results include an Archive option in the report toolbar.
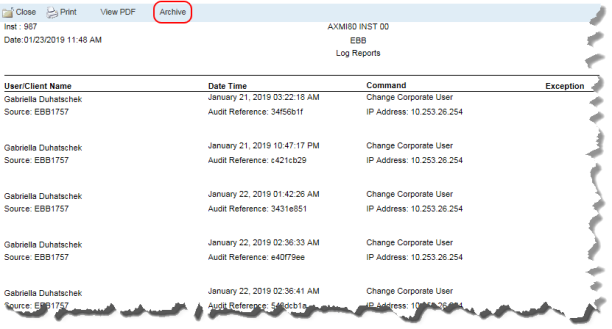
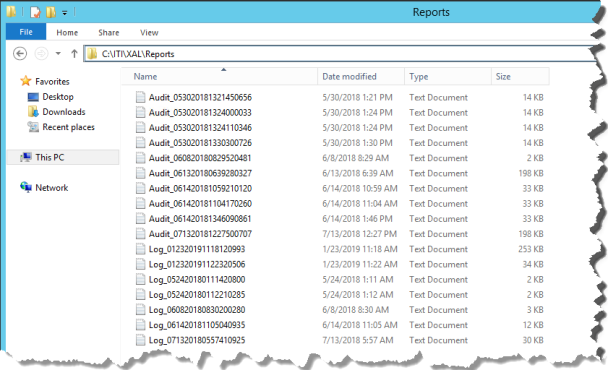
Selecting this option generates a text file output of the report in the C:\ITI\XAL\Reports directory on the server where you installed the Shared Audit and Log Administrator (XAL1751) program.
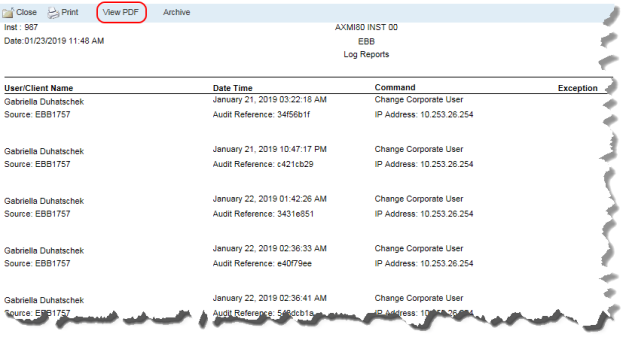
View PDF – Data Center Only
When you sign in to Access Manager as a data center user (that is, as institution DC); audit and log report results include a View PDF option in the report toolbar. Selecting this option prompts you open or save a PDF copy of the report in a local file directory. For example, C:\Users\GWashington\Downloads.
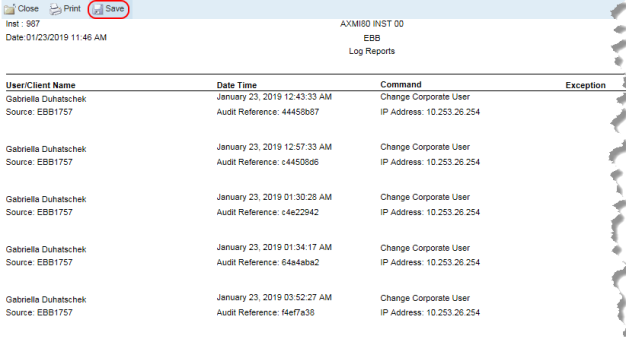
Save – Institution Only
When you sign in to Access Manager as a financial institution user (for example, as institution 01); audit and log report results include a Save option in the report toolbar. Selecting this option prompts you to save a PDF copy of the report in a local file directory. For example, C:\Users\GWashington\Downloads.
See Also
Back to Top
Shared Audit and Log Administrator 2.0
Fiserv Confidential | Intended Only for Fiserv Shared Audit and Log Clients ©2009 -2021 Fiserv, Inc.